02 - CoAP
1. Introduction
This laboratory concentrates on CoAP. An exemplarily device (“thing”) will be implemented. The device manages some sensors and actuators and uses CoAP as protocol to communicate with itself or remote devices (“things”). As device the Raspberry Pi is used. The sensors and actuators are represented by the GrovePi board and its resources (button, led, rotary angle sensor, etc.).
Further on this laboratory covers also a closer look at the CoAP communication messages.
The developed code during this laboratory can later on serve as a basis for upcoming projects during the lab lessons. Be sure not to delete it before the course is at it’s end.
2. Learning Aims
There are no learning aims associated with this laboratory exercise.
3. Prerequisites
Raspberry Pi device (with MAC address labeled around the Ethernet port)
[micro]SD card with at least 8 GB capacity.
Raspberry Pi Power supply.
1 GrovePi board
1 GrovePi Button
1 GrovePi LED (colour indifferent)
1 Computer (your own laptop or a laboratory machine)
Ethernet port
SSH client installed (ssh, PuTTY, …)
CoAP client program from the
libcoaplibrary. [… or alternatively, a pre WebExtensions API version of the Mozilla Firefox web browser with the Copper (Cu) Firefox addon as CoAP protocol handler.]Wireshark (Network packet capturing software)
Zip software (7-zip, WinZip, …)
Editor of your choice for modifying the code base.
4. Getting started
4.1 A few words of introduction
This laboratory has been developed and tested on a Linux machine. In principal it should work fine on Mac OS X and Windows too. Should you run into problems with the libraries or scripts provided with this laboratory it is maybe worth trying to use a Linux VM on your laptops host system in order to complete all the demanded tasks.
4.2 Preparation of the hardware
Connect the GrovePi board to your Raspberry Pi, then connect a GrovePi LED to the digital pin D4 and a GrovePi button to the digital pin D3. Make sure that the Raspberry Pi and your development machine are connected to the IoT subnet. As mentioned earlier, it is a good idea to turn off all the other network adapters (WLAN, …) on your development machine during the lab. If you are connected to the IoT subnet you should have connectivity to the “internet”.
4.3 Installation of the required packages (already installed)
This section is just informative. It can be skipped since all the required packages are already present on the provided disk image.
It is assumed that you have completed the previous laboratory. Due to that you should have a [micro]SD card with a working Raspbian operating system on it with all the necessary packages installed to interact with the GrovePi board and its resources.
Start up your Raspberry Pi and log in as pi user via a SSH client of your choice.
The packages which delivers the ability to talk CoAP requires Python with a version number >= 3.4.x. Python3 is already part of the Raspbian installation on your [micro]SD card but we have to tell python3 about the installed GrovePi packages. Otherwise it will fail to import grovepi.
This is realized by invoking the following commands:
cd /home/pi/Dexter/GrovePi/Software/Python/sudo python3 setup.py install
Further on, the aiocoap library (on which the coapthing application is based on) requires the Link Header package. It can be installed via the python package manager pip:
sudo pip3 install LinkHeader
4.4 Upload and test the provided code template
Recursively upload the directory that contains the code template (CoAP_thing) which is provided with this documentation to your Raspberry Pi. Change into the CoAP_thing/src/ directory, where the following files can be found:
-rw-r--r-- 1 pi pi 3356 Sep 30 18:23 Actuator.py
-rw-r--r-- 1 pi pi 4089 Sep 30 18:23 ButtonResource.py
-rw-r--r-- 1 pi pi 3642 Sep 30 18:23 coapthing.py
-rw-r--r-- 1 pi pi 4246 Sep 30 18:23 LedResource.py
-rw-r--r-- 1 pi pi 1284 Sep 30 18:23 log.py
-rw-r--r-- 1 pi pi 2740 Sep 30 18:23 Sensor.py
-rw-r--r-- 1 pi pi 2364 Sep 30 18:23 TimeResource.py
The program entry point is located in the module coapthing.py.
Start the program: python3 ./coapthing.py
The application uses a python logger which is configured to be very verbose since the application is in a development state. Do not be concerned about if your console gets spammed with log messages during the application runs.
To test the functionality of the application it is sufficient for now to test if the connected LED turns on as long as the connected button is pressed and switches off again if the button is released.
The program can be terminated by pressing Ctrl + C.
4.4.1 Upload data to the Raspberry Pi
There are many possibilities uploading data to the Raspberry Pi.
Raspberry Pi
The direct method is to clone the github repository directly on the Raspberry Pi itself. This can be done doing the following commands in the shell:
# go to home directory
cd ~
# clone IoT_students repo from github
git clone https://github.zhaw.ch/IoT/IoT_students
Windows
On Windows Operating Systems it is adviced to upload data through a samba mount described in the Annex of lab 1.
Linux
The easiest way to upload files to a Raspberry Pi on a linux system is to use the scp - OpenSSH secure file copy tool.
Download the sources from
git.Extract the downloaded ZIP archive and upload it tothe Raspberry Pi.
# extract zip archive
unzip IoT_students-master.zip

# upload folder recursively
scp -r IoT_students-master pi@<raspi-ip>:~
4.5 Browsing CoAP resources
In order to browse CoAP resources, there are several approaches
to do so. Two of these approaches are described in the following
two subsections. Choose either one, preferably the CLI coap-client,
in order to solve some of the following laboratory tasks.
4.5.1 coap-client as part of the libcoap project (CLI)
This is the preferred approach. The libcoap package is already
installed on the Debian GNU/Linux systems on the machines in the rooms
TE523/4/8. If you are running a unixoid operating system (natively or,
e.g., through WSL) and want to use your own device, feel free to
install the libcoap with a package manager of your liking.
In the following, there are some examples listed on how to invoke
the coap-client, in order to query CoAP resources. If you get stuck,
it is always a good idea to consult the manual page of the
coap-client. To do so, start a terminal and retrieve the manual
page, i.e. man coap-client-notls.
coap-client examples
By default, the coap-client uses confirmable messages (CON) to
interact with the peer device. If one wants to use non-confirmable
(NON) messages, one has to explicitly specify this by additionally
passing the -N flag when invoking the coap-client.
Discover resources of a CoAP node/endpoint:
$ coap-client-notls -m get coap://<ipv4.of.your.raspberrypi>/.well-known/core
Get payload from a specific resource on a CoAP node/endpoint:
$ coap-client-notls -m get coap://<ipv4.of.your.raspberrypi>/sensors/button0
Send payload to a specific resource on a CoAP node/endpoint:
Generic approach. The payload stems from an arbitrary file. Within
this example, the ASCII character bytes for the boolean value are
piped to stdin of the coap-client who uses stdin (-) as the
file.
$ printf "True" | coap-client-notls -m put coap://<ipv4.of.your.raspberrypi>/actuators/led0 -f -
ASCII text specific approach. Syntactic sugar to directly send ASCII-text-only payload messages.
$ coap-client-notls -m put coap://<ipv4.of.your.raspberrypi>/actuators/led0 -e "False"
Observe an observable resource on a CoAP node/endpoint for n
seconds. In this concrete example, n = 60:
$ coap-client-notls -s 60 coap://<ipv4.of.your.raspberrypi>/sensors/button0
coaping program
The coap-client does not provide the possibility to autonomously
send CoAP ping messages. However within this laboratory we want to
observe the behaviour of the CoAP ping message sequence. On the good
old FTP server, you are already familiar with since laboratory one,
(ftp://jupiter.lab.iot1, user: iotro, pass: iotro,
path: /shared/IoT/p2.), there are binaries available, targeted for
various operating system flavors, of the coaping program. After
unpacking the archive, the coaping program can be launched as
follows: ./coaping <ipv4.of.your.raspberrypi> from within the
directory where the coaping binary is stored.
4.5.2 Copper (Cu) addon for the Firefox web browser (GUI)
As an alternative approach, the Copper Firefox addon provides a CoAP client with a graphical user interface. Unfortunately, the WebExtensions API, which was integrated into the Firefox web browser since version 56, does not allow implementing protocol handlers anymore.2
Disciples of the Windows operating system find a portable version of Firefox (version < 56) with a pre-installed Copper addon. The benefit of the portable version is, that it doesn’t affect already installed Firefox versions. The portable version of Firefox can be found at:
Server/Host: jupiter.lab.iot (ftp://jupiter.lab.iot) User: iotro Password: iotro Location on FTP server: /shared/IoT/p2
Alternatively, the Debian GNU/Linux operating system of the laboratory
machines in the rooms TE523, TE524 and TE528 has a pre-installed
ancient (v 55.x) Firefox Developer edition browser available which
also has the Copper addon already installed. It can be launched
through the desktop icon, named ff-55-dev.
To check if your Firefox browser supports CoAP visit: coap://coap.me:5683. The Copper GUI should be displayed and show some resources on the left side.
5. Analysis of the CoAP protocol
It is highly recommended to persistently store the CoAP message sequences which are requested to be performed during this section. When handing up the laboratory, these captures can be shown to the laboratory advisor. The captures are also a precious good during the learning phase in preparation for the final exam. How to store Wireshark capture files is described in a following subsection.
5.1 First CoAP request / resource detection
If you successfully started the
CoAP_thingapplication earlier in this laboratory, log in to your Raspberry Pi and start the application again.Start Wireshark on your development machine and capture your LAN interface which is connected to the IoT subnet.
If there is to much traffic on that line, write coap in the filter field in order to hide all the other traffic.
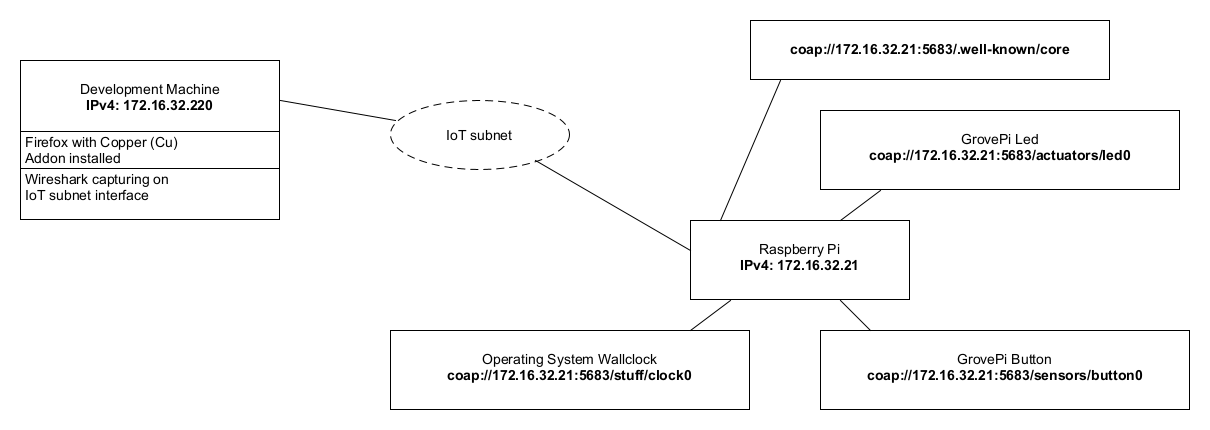
Retrieve a list of the resources which are provided through the
CoAP_thingapplication, i.e.:$ coap-client-notls -m get coap://<ipv4.of.your.raspberrypi>/.well-known/core.well-known/core is a special path which is typically available on a CoAP server and it is used for resource detection. In the following illustration below, the IP addresses are only exemplary.
Firefox Copper (Cu) addon alternative: Open the specific Firefox version (described earlier above) on your development machine and visit the following place: coap://<ipv4.of.your.raspberrypi>:5683/
Press Discover on the Copper GUI. This will invoke a GET request to the path .well-known/core on the CoAP server.
The server should have responded with a list of all his resources. There are some specialties to note here. CoAP uses a so called piggyback acknowledgment. As you can see in the Wireshark capture, by default, the client (
coap-clientor Copper alternatively) uses a confirmable packet (CON) for the request which tells the server that it must send an acknowledgment message. To save bandwidth, the server tries to combine theACKand the answer message.Another important thing is the response code. CoAP uses, like HTML for instance, response codes to indicate whether a request has succeeded or if it has failed. Check https://tools.ietf.org/html/rfc7252#page-48 to get a list of possible response codes.
5.1.1 Persistently storing (CoAP) network data captures
One can export specific packets like this:
Add a filter expression for the type of packets you want, e.g. coap.
Check if the capturing process is stopped.
File → Export Specified Packets.
Packet Range: Displayed packets only.
Save the capture as Wireshark/tcpdump
pcapfile.
5.2 CoAP in deep
The basic procedure to connect to a device which is able to process
CoAP requests (Raspberry Pi with running CoAP_thing application)
should now be clear. Our client to connect to the device is the
coap-client*(-notls) as part of the libcoap library (or
alternatively the specific Firefox browser version with the Copper
(Cu) addon installed). To get more familiar with the CoAP client, feel
free to test its functionalities, e.g.:
Observe the button and see if you can watch its changing value while the button is pressed on the device.
Try to turn on / switch off the LED on the device by sending put requests to the CoAP server on the Raspberry Pi. The request payload is a literal boolean value in ASCII text form. Valid payload for the LED would be: True [On] or False [Off].
5.2.1 Your tasks
Start Wireshark to capture on the interface which is connected to the IoT subnet.
Run the
CoAP_thingapplication on the Raspberry Pi and query it via thecoap-client*(-notls)(or alternatively via specific Firefox version with the Copper (Cu) addon installed):coap://<ipv4.of.your.raspberrypi>:5683/Write some
GETrequests to arbitrary resources which are exposed to the network through theCoAP_thingapplication. Also investigate the difference between confirmable and non-confirmable requests.Use the
coapingprogram (or alternatively the ping button of the Copper (Cu) addon) to send CoAP ping messages towards theCoAP_thingapplication on your Raspberry Pi device. What kind of packet is used. Is there a special ping packet or flag?We have already captured the get
GETcommand. Try the other 3 REST commands (POST,PUT,DELETE) on the button and the LED resource. Not all commands are implemented on all resources. Which are implemented for which resource? Store the captures and take notice of the error code in case of an erroneous request.While examining you may have noticed that the LED implements only the PUT method for writing to the resource. What response code do you get when requesting with a valid payload (
TrueorFalse)? Send the same requests consecutively and check the response code. Also sendPUTrequests with invalid payload and see what response code is returned now. Does the returned error code support content?We chose to use
PUToverPOSTas our ‘update’ method. Do you agree with that choice? Wouldn’t POST have been better? Should we implement both, as they should behave the same, or what should be the difference in your opinion?
The last and probably most important CoAP feature is to observe so called observable resources. Try to observe the button resource and see what is happening if the button gets pressed. Capture the whole observe time period / CoAP network traffic. Do it once in a
CONand once in aNONfashion. Name at least one scenario each, whereCONor whereNONmessages are desirable.There are additional options for the CoAP packets which can be specified. Consult the manual page of the
coap-client(or alternatively have a look at the behaviour tab of the Copper (CU) addon). Test some of them. Write down (capture) what you have tested. Did you find something interesting?
5.2.2 Known Bugs / Errata
When working with non-confirmable messages and using the CoAP_thing
application as “server”, then an ACK is returned from the server.
This behavior is wrong and results due to a bug in the aiocoap
library (v-0.2).

Wrong behavior of non-confirmable CoAP messages.
The correct behavior, tested against coap://coap.me:5683 would look like:

Correct behavior of non-confirmable CoAP messages.
6. The CoAP_thing application
In this chapter the application which was uploaded to the Raspberry Pi and then used to perform the tasks in the CoAP analysis chapter is now going to be examined in a more detailed manner.
If one is more familiar with the application and the use of the aiocoap package, the application can
be extended and resources (sensors/actuators) across the IoT subnet can be applied. The aim is that
the devices (Raspberry Pis) are able to exchange data supplied through the CoAP protocol.
6.1 Study the architecture
The application is entirely written in Python (version 3.4.2). The implementation of CoAP is
provided by the aiocoap package. In general the implementation of CoAP_thing uses object
orientation, but it was decided to stay in a pragmatic scope and not to exaggerate the object
orientation.
6.1.1 aiocoap - The Python CoAP library
The aiocoap package is a Python implementation of CoAP, the Constrained Application Protocol
(RFC 7252, more info at http://coap.technology/).
It uses the asyncio module introduced in Python 3.4 to facilitate concurrent operations while
maintaining a simple to use interface and not depending on anything outside the standard library.
Source: https://github.com/chrysn/aiocoap
If further code examples or informations are needed, refer to the aiocoap documentation which can
be found at: http://aiocoap.readthedocs.io/en/latest/
Concept of coroutines
As mentioned earlier, aiocoap uses coroutines instead of e.g. threads to manage concurrent
instructions. To solve all the tasks within this laboratory it should be sufficient to consult the code of
the CoAP_thing template, to get it all managed with async coroutines.
Since this is not mainly a Python course but if you still want to gain a profound understanding of
asynchronous I/O, event loop, coroutines and tasks, the documentation of Python’s asyncio package
is located at:
https://docs.python.org/3.4/library/asyncio.html
A revealing depiction with a sequence diagram of a very basic coroutine implementation can be found at: https://docs.python.org/3.4/library/asyncio-task.html#example-chain-coroutines
6.1.2 Basic concept
The CoAP_thing application consists of a main module, coapthing.py, which represents a CoAP
server. The server itself provides resources (sensors and actuators) which can be reached, observerd
and modified via a CoAP URI, e.g.: coap://<ipv4.of.raspberry.pi>:5683/actuators/led0
The basic CoAP_thing template consists of a CoAP server with the following resources (all observable):
button0: GrovePi Button
led0: GrovePi LED
clock0: Resource which gets the operating system’s time and serves it to the requester.
The resources have the following class structure:
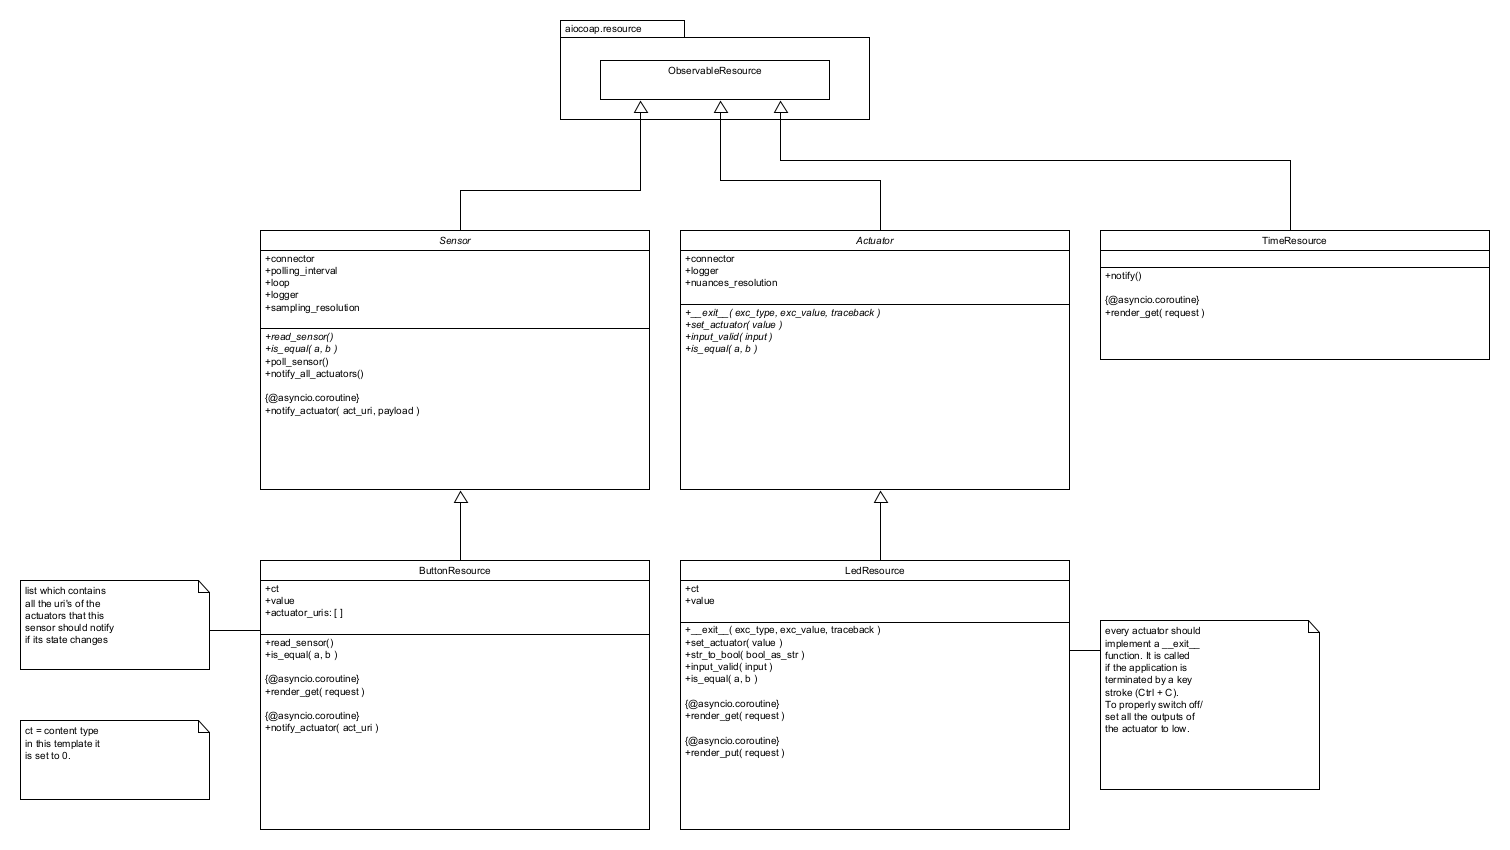
This class diagram shows only the most important functions / instance variables at current classes.
Key Points of the application regarding CoAP
PUT requests are sent when actuators are getting notified. Check out the code of the method
notify_actuator in the ButtonResource and the Sensor class. The payload of the sensor value is
encoded as ASCII characters before sending (This makes it easier to interpret when capturing CoAP
messages).
The PUT requests are processed on the actuator side within the render_put method.
GET requests on the Sensor as well on the Actuator side are processed within the render_get method. See classes Sensor, LedResource for example.
All the other CoAP mechanisms (observe, discover, …) are handled by the aiocoap library. As you can see, we derive all our classes from the ObservableResource class from the aiocoap.resource package.
6.1.3 Object diagram
The following object diagram illustrates the CoAP_thing server in its running state:
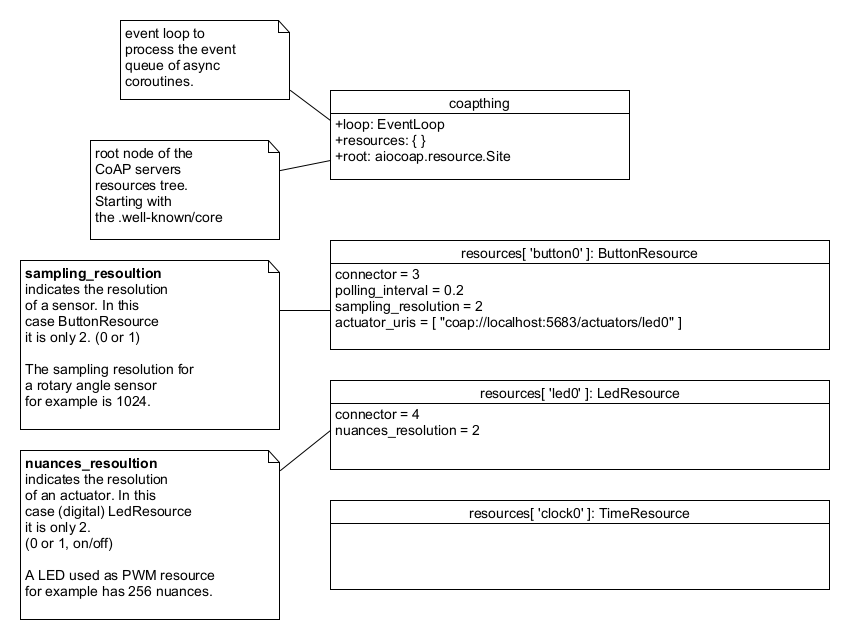
This trivial server implementation has one button which has only one actuator to notify. In this case the actuator is located on the same machine as the sensor (localhost).
6.1.4 Network situation
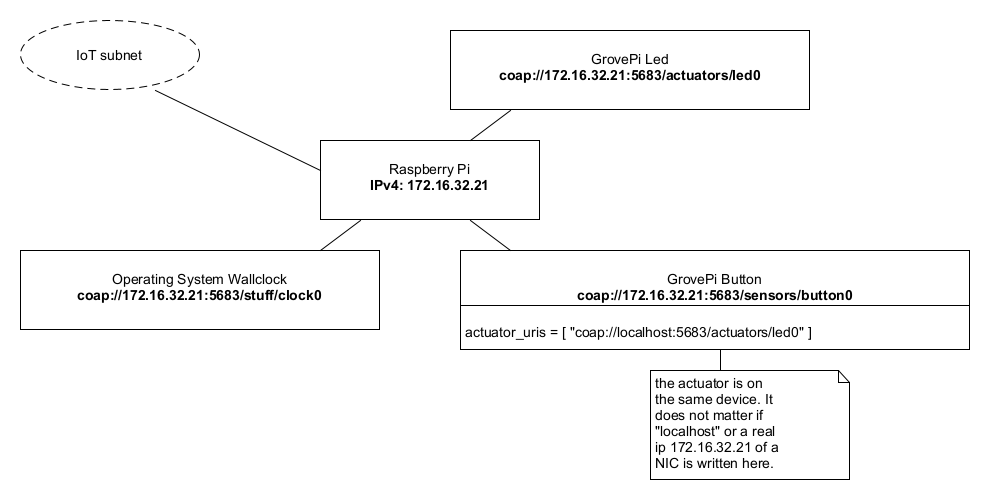
The IP addresses are only exemplary!
6.2 Expand the application
Now after getting a first glance, the basic concept of the CoAP_thing application should be
understood. For this task at least 2 Raspberry Pi’s are needed. Therefore you should work in groups
of two or three.
To start and see if the CoAP_thing application also works distributed over a network, it is
recommended that a very simple network scenario is implemented first.
6.2.1 Scenario: 2 RPi’s, 1 button, 2 LED’s
Try to extend the application to achieve the following situation:
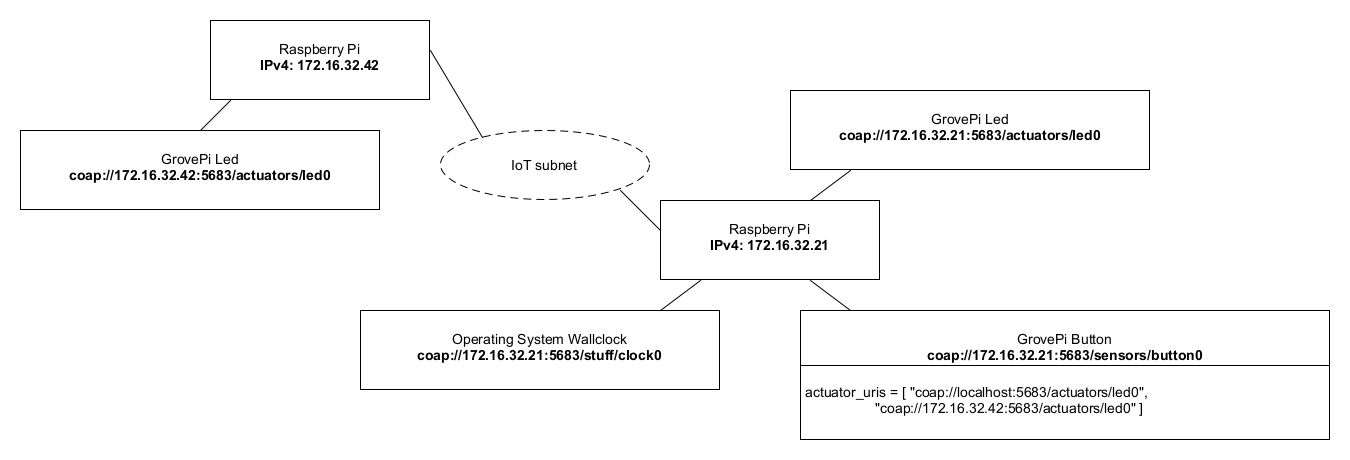
The IP addresses are only exemplary!
If everything was adjusted the right way, the LED’s on both Raspberry Pi should light up when the button is pressed and switch off when the button is released again.
6.2.2 Scenario: 2 RPi’s, 1 button, 1 rotary angle sensor, 3 LED’s
It is not mandatory to implement exactly this scenario. This is just a proposal. You are free to choose and implement every sensor/actuator that is available in the laboratory. The only condition is that your distributed application is somewhat more sophisticated than the one in the previous scenario.

The IP addresses are only exemplary!
Additional to the previous scenario a rotary angle sensor and another LED were connected to the GrovePi boards here. The rotary angle sensor should dim the LED. (Remember the first laboratory, example GrovePi Python scripts.)
But now the sensor values have to be transferred over the network. Try to implement the resources and think about how this could be done and which values have to be transmitted.
7. Prepare your own IoT project
In the last laboratories of this course you will have the task to write your own IoT application. This
means you will implement a client/server application on your Raspberry Pi similar to the
CoAP_thing application we have just worked with. The communication of the application parts has
to be realized with the lightweight protocols CoAP or MQTT (see later laboratory). The application
should announce its resources to the world (like our CoAP_thing) and also run some logic to use its
actuators for a meaningful application. You can also use a database if you want to e.g. record sensor
data and derive some statistic plots at a given time. A later laboratory covers the setup and basic
commands of a distributed data base system. You will have the chance to order additional special
sensors/actuators for your project.
Basically the IoT project is meant to be realized in groups with 2 – 3 members.
7.1 Your tasks
Think of an application for your Raspberry Pi. It will need to meet the following criteria:
Usage of local sensors
Publication of all your Resources via a protocol (CoAP or MQTT) (Except you have valid reasons not to do that. [Privacy])
Usage of remote sensors (the application consists of at least 3 Raspberry Pis)
Additional Points
Usage of complex Sensors Cameras etc. (Keep in mind that you will only have 4-8h to complete the Task don’t over do it).
Usage of a Database (at least a file system)
Clever usage of database values. (database design)
Usage of global sensors (not from within the IoT class) (only if there is a reason to use them)
Usage of hybrid technologies like using additional protocols like HTTP proxies, etc.
Until next laboratory:
Have a broad concept of what you want to do
Check the stock in the IoT laboratory room if you find all the sensors/actuators you require for your own project. If you can’t find all the material, then check https://www.pi-shop.ch/ for sensors/actuators (GrovePi) you will need to accomplish that concept. Also check the availability of the items you want to have ordered (sometimes delivery times may exceed the end of the semester)!
Inform your lecturer about your concept and what sensors/actuators you need to materialize your idea. Also where they are going to be set up. Maybe some devices/sensors/actuators can be shared within the IoT class.
8. Grading
4 points maximum will be awarded for completion of the exercises.
- 1
If one wants to access the FTP server from outside the laboratory rooms (TE523/TE524/TE528), it can be reached from within the ZHAW infrastructure or via VPN tunnel towards it at the address:
ftp://jupiter-win.zhaw.ch.- 2
https://github.com/mkovatsc/Copper/tree/master?tab=readme-ov-file