04 - Cassandra
Introduction
In this lab we are going to have a closer look at Cassandra, a database engine which was designed for high availability and scalability. To achieve these goals the databases on the Cassandra engine are distributed on any desired nodes. The Cassandra engine focuses upon a decentralized architecture. We build a simple cluster, create a table and modify data by using the Cassandra Query Language (CQL).
Further on we will have a quick look at the cqlsh, establish a connection to our Cassandra cluster and run simple read and write queries against the Cassandra database. We then examine an application architecture with whose we are able to handle request storms, in our case from an MQTT broker and write down data to a replicated database like Cassandra.
Prerequisites
Hardware with following key specifications
>= 8 GB of RAM recommended.
>= 3 CPU Cores.
Virtualisation supported by the CPU (VT-x/AMD-V) would be a big plus.
At least 32 GiB of free disk space to place the virtual disk image of the guest machine.
Virtualisation environment (
libvirt[KVM] / VMWare Player / VirtualBox).Virtual hard disk image (hostname:
iot-lab-vsrvr) provided by this lab.Get it from inside of the laboratory subnet (net: 172.16.32.0/20).
At least 1 Raspberry Pi to submit data to a MQTT broker.
Raspberry Pi operating system (formerly
raspbian).
Conventions used
When unclear whether a certain shell command is invoked as regular
user or explicitly from within a root shell, the following
convention is introduced: Command prompts to be executed from within
a root shell are preluded with a pound sign (#), the ones that
are sufficient to be executed as non-root user are preluded with a
dollar sign ($).
[!NOTE] A
rootshell is just a command line interpreter (shell) which is opened as therootuser of the operating system. To open arootshell, fire up a terminal and typesu(switch user) without any argument. You will be asked to enter therootpassword (i.e.:KT-Praktika). Now, one has a terminal window ready with ashellwhich was opened asrootuser.
Getting started
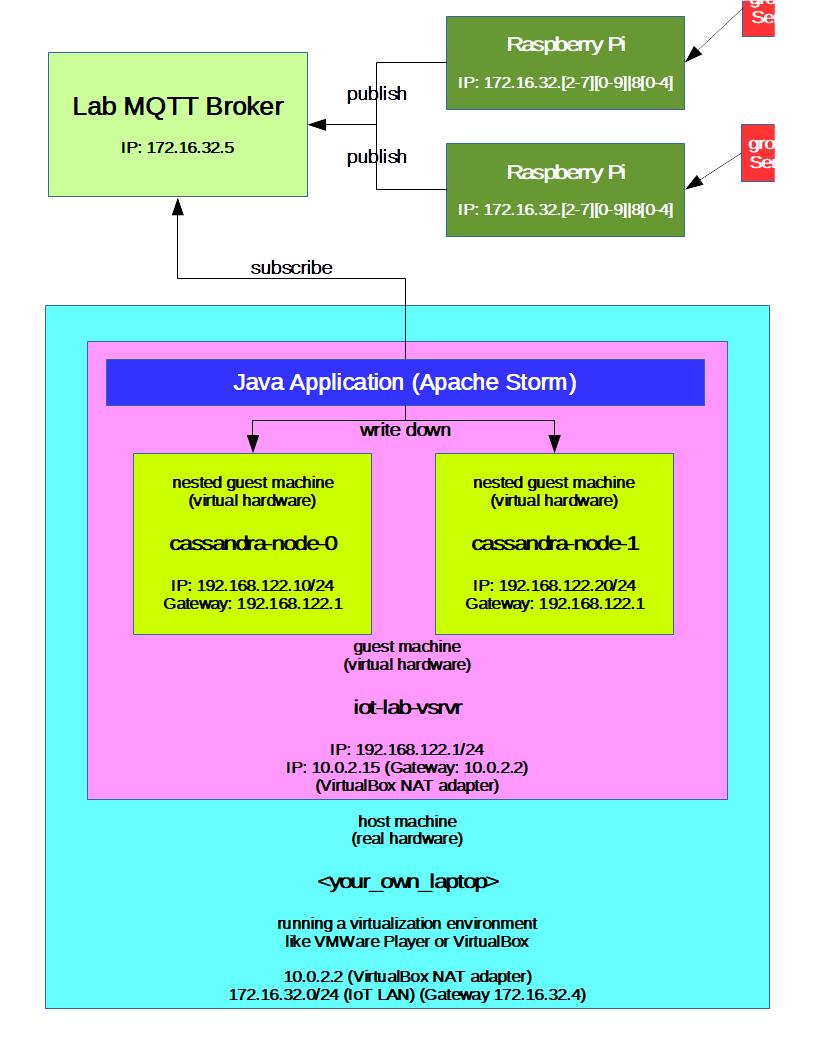
Environment overview
Alternate environment setup
If you are outside of the IoT subnet (172.16.32.0/20), and don’t
have access to the lab broker, you can start the mosquitto broker on
the iot-lab-vsrvr by invoking the command: $ sudo service mosquitto start. Remember that in this case you have to change the virtual
machine’s network adapter to a “Bridged Adapter”, so that
<your_own_laptop>, the iot-lab-vsrvr and your Raspberry Pi’s
reside in the same subnet.
Setting up the guest machine iot-lab-vsrvr
Get the virtual hard disk image from inside of the lab subnet
(172.16.32.0/20) via:
ftp://jupiter.lab.iot/shared/IoT/p4
FTP-User: iotro
FTP-Password: iotro
You can download the image from outside the ZHAW LAN as well. When connected to the ZHAW VPN use the following FTP download site with the same credentials as above:
ftp://jupiter-win.zhaw.ch/shared/IoT/p4
Uncompress the downloaded virtual hard disk image:
$ unxz <disk_img_name>.qcow2.xz
If you chose another virtual hosting environment than libvirt
(KVM) you might need to convert the *.qcow2 disk image to the
appropriate virtual disk format, e.g. *.vdi, *.vmdk, … Example
for converting a qcow2 to a vdi disk image in the following:
$ qemu-img convert -O vdi <disk_img_name>.qcow2 <disk_img_name>.vdi
Set up a virtual machine on your virtualisation environment and use the virtual disk image, you just downloaded (it is a 32 bit debian system). Recommended are the following settings:
4 GiB of RAM.
> 2 CPU cores (Just one single core will not work!).
Enable PAE/NX (when using VirtualBox).
Enable nested virtualisation, VT-x/AMD-V.
Network adapter in NAT mode (or a bridged adpter if you use the alternate environment setup).
Start the virtual machine. On the virtual machine with the hostname
iot-lab-vsrvr you can operate with these credentials:
Username |
Password |
is sudoer? |
|---|---|---|
iotusr |
iotlab |
yes |
root |
iotlab |
yes (root user) |
Exemplary step-by-step virtual machine setup
If you chose to use the laboratory infrastructure,
{TE523,TE524,TE528} (Dell o9020 or Dell o7070 machines), for hosting
the virtual machine, this section describes the setup step by step.
Launch a terminal window and start the
libvirtdaemons (as root / sudoer), i.e.:
$ sudo systemctl start libvirtd
$ sudo systemctl start virtlogd
… or alternatively from within a root shell, i.e.:
# systemctl start libvirtd
# systemctl start virtlogd
Start the default virtual network (as root / sudoer), i.e.:
$ sudo virsh net-start default
Fire up the Virtual Machine Manager. By doing so, you might have to authenticate for the
ktlaboruser. The password isKT-Praktika.File -> New Virtual Machine. At step 1, choose “Import existing disk image”. Further expand the Architecture options and choose
x86_64.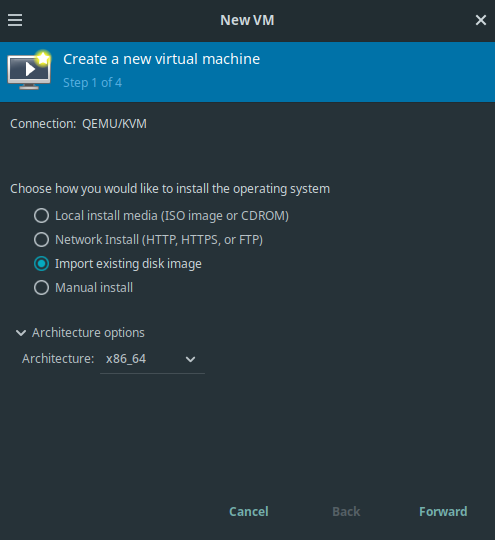
Virtual Machine Manager: Creating a new VM, step 1.
At step 2, select the previously downloaded and inflated (decompressed)
qcow2hard disk image. Click “Browse Local” when asked to “Locate or create storage volume”. When choosing the operating system, tick the box “Include end of life operating systems” and select Debian 8. A search permission dialogue might appear with the question to automatically correct the permissions. Answer this question with Yes.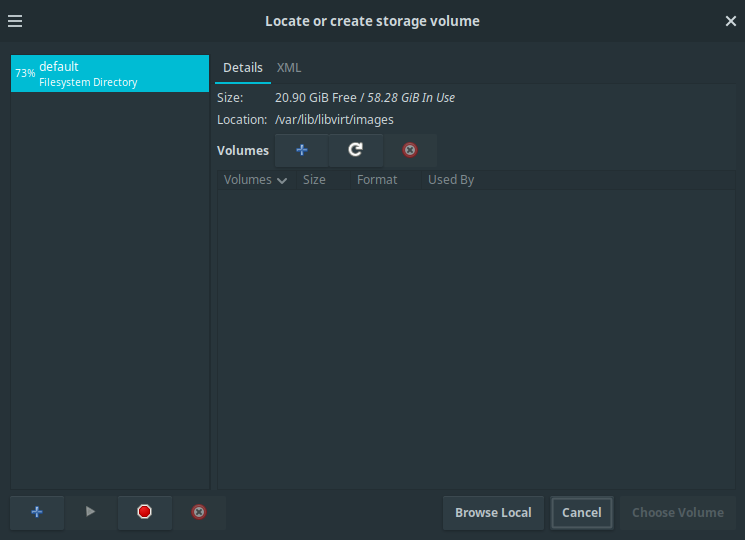
Virtual Machine Manager: Creating a new VM, step 2. Browse for the
qcow2hard disk image.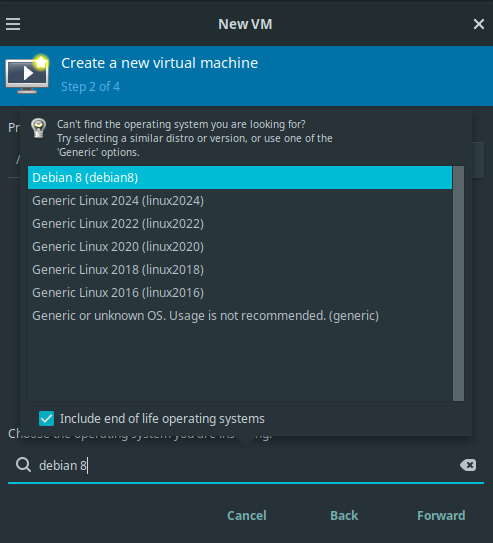
Virtual Machine Manager: Creating a new VM, step 2. Select guest operating system.
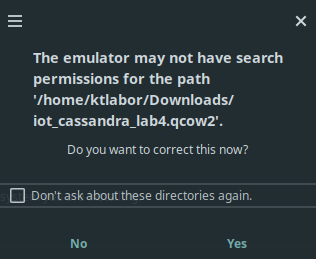
Virtual Machine Manager: Creating a new VM, step 2. Fix permission issue dialog.
At step 3, define 4096 mebibytes of memory. When on a o9020 machine (i.e. in room TE523), select 3 CPU cores. On a o7070 machine, one can easily select [4, …, 6] CPU cores.
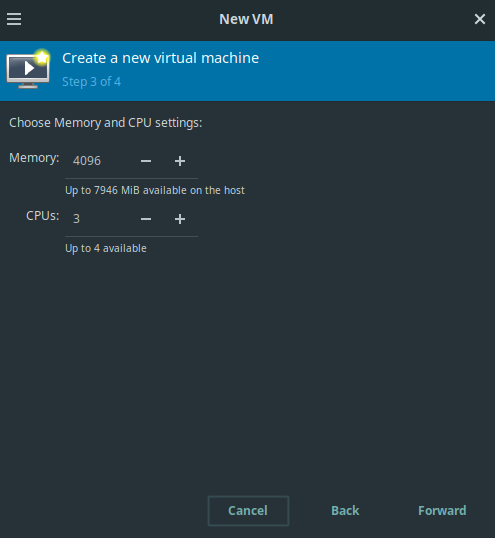
Virtual Machine Manager: Creating a new VM, step 3. Defining memory and CPU cores.
At step 4, define a meaningful name for the virtual machine, e.g.
iot1-lab4-cassandra-host. Check that thedefaultvirtual network is selected. (When asked to start the virtual network, confirm the question with Yes.)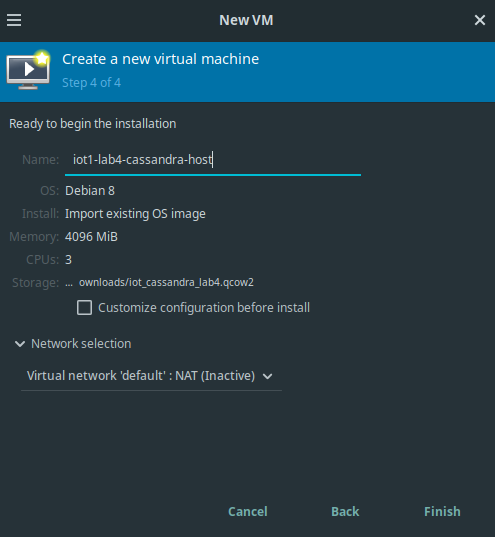
Virtual Machine Manager: Creating a new VM, step 4. Naming the VM and select the virtual network.
After completing step 4 successfully, the virtual machine should start and boot the guest operating system. Once the boot process has completed, one should be able to log in with the
iotusruser (see above for the credentials).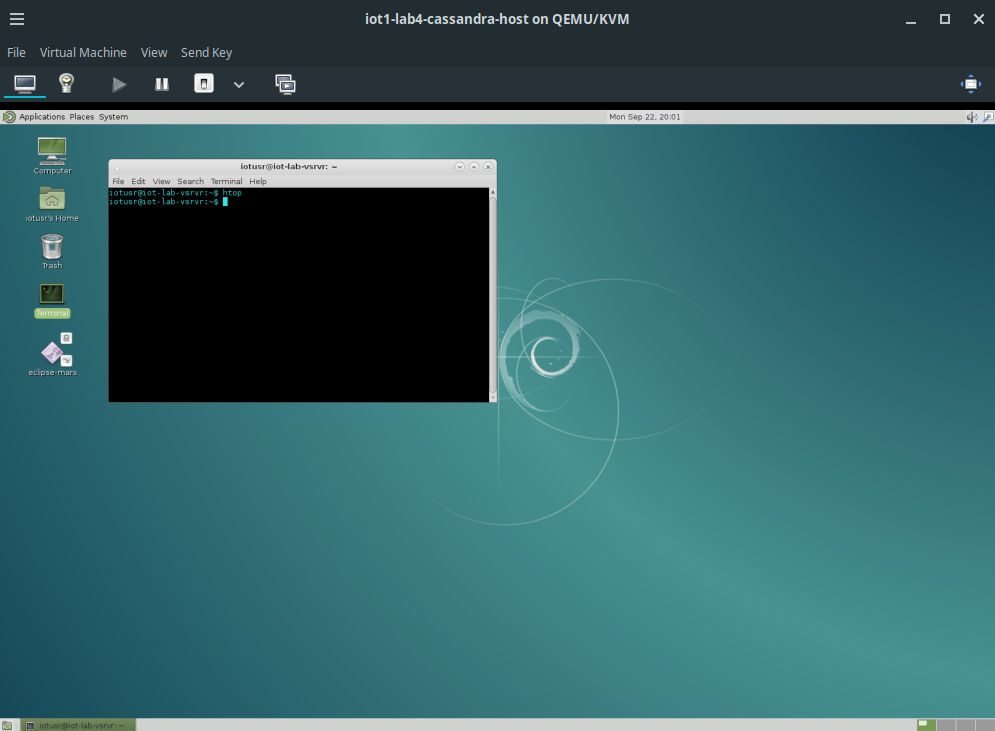
Virtual Machine Manager: Running VM with guest OS after installation completion.
Apache Cassandra
In this section we are going to set up a Cassandra cluster with a very
trivial configuration, on two virtual database nodes. These nodes run
on the iot-lab-vsrvr host, namely cassandra-node-0 and
cassandra-node-1. Later on, we use the cqlsh to get in touch with
the CQL language and run simple queries against the distributed
database.
Introduction
Architecture Overview
Some key features of a Cassandra database system are listed below:
Cassandra was designed with the understanding that system/hardware failures can and do occur
Peer-to-peer, distributed system
All nodes the same (No master-slave architecture or anything similar)
Data partitioned among all nodes in the cluster
Custom data replication to ensure fault tolerance
Read-/Write-anywhere design
Each node communicates with each other through the Gossip protocol, which exchanges information across the cluster every second
A commit log is used on each node to capture write activity. Data durability is assured.
Data also written to an in-memory structure (memtable) and then to disk once the memory structure is full (an SStable)
A keyspace is akin to a database in the RDBMS table but is more flexible/dynamic
6A row in a column family is indexed by its key. Other columns may be indexed as well.
Source: http://www.slideshare.net/DataStax/an-overview-of-apache-cassandra
In our installation we are going to use a basic setup and only two nodes to replicate our databases:
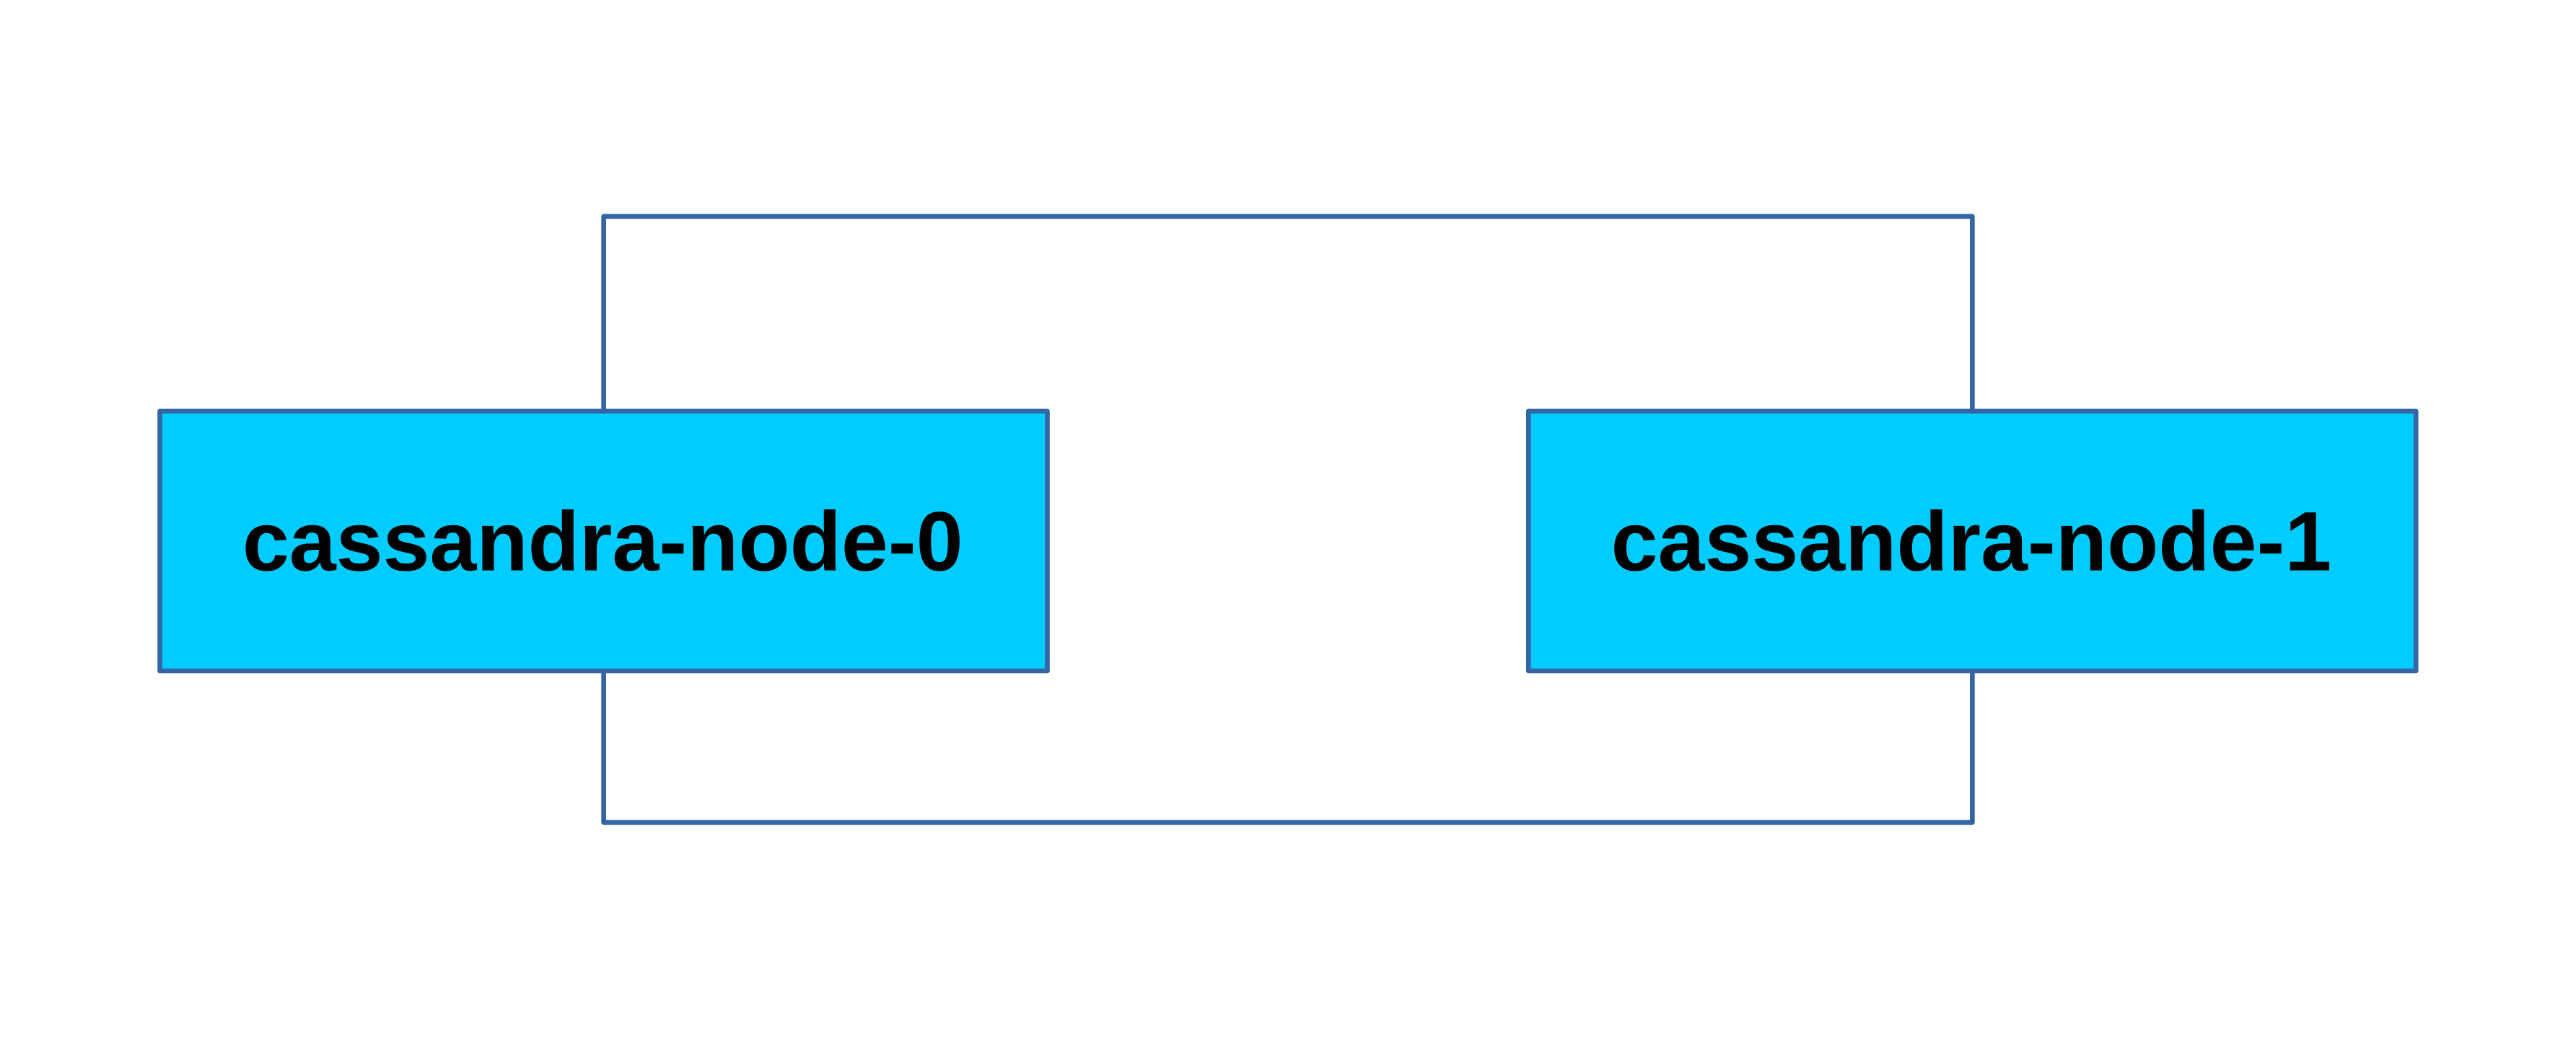
Which means that we can run queries against arbitrary nodes in the Cassandra cluster and all the changes are replicated all over the cluster. As you can see, Cassandra builds a ring structure including all its available nodes.
Snitches
A snitch determines which data centers and racks are written to and read from. Snitches inform Cassandra about the network topology so that requests are routed efficiently and allows Cassandra to distribute replicas by grouping machines into data centers and racks. All nodes must have exactly the same snitch configuration. Cassandra does its best not to have more than one replica on the same rack (which is not necessarily a physical location).
Note: If you change the snitch after data is inserted into the cluster, you must run a full repair, since the snitch affects where replicas are placed.
Snitch types Cassandra supports:
Dynamic snitching Monitors the performance of reads from the various replicas and chooses the best replica based on this history.
SimpleSnitch The SimpleSnitch is used only for single-data center deployments.
RackInferringSnitch The RackInferringSnitch determines the location of nodes by rack and data center.
PropertyFileSnitch Determines the location of nodes by rack and data center.
GossipingPropertyFileSnitch Automatically updates all nodes using gossip when adding new nodes and is recommended for production.
Ec2Snitch Use with Amazon EC2 in a single region.
EC2MultiRegionSnitch Use this snitch for deployments on Amazon EC2 where the cluster spans multiple regions.
Source: http://docs.datastax.com/en/cassandra/1.2/cassandra/architecture/architectureSnitchesAbout_c.html
In our simple architecture with only 2 nodes in 1 “datacenter” we use a SimpleSnitch as endpoint snitch, which is sufficient for this purpose. In the configuration file this is the default and doesn’t have to be changed.
If you want to go in deep an explore all the configuration possibilites and setup concepts of a Cassandra cluster e.g. a distributed cluster over many datacenters, etc. you can do so by consulting the Datastax Documentations: http://docs.datastax.com/en/index.html
Installation
To install the Cassandra cluster we operate as the user iotusr on
the iot-lab-vsrvr.
As you have started your iot-lab-vsrvr in a previous section, one
can open a terminal and cd in the labs directory:
$ cd /home/iotusr/IoT/p4
We first have to create a virtual switch in NAT mode to build our own subnet which has also an uplink to the outside world.
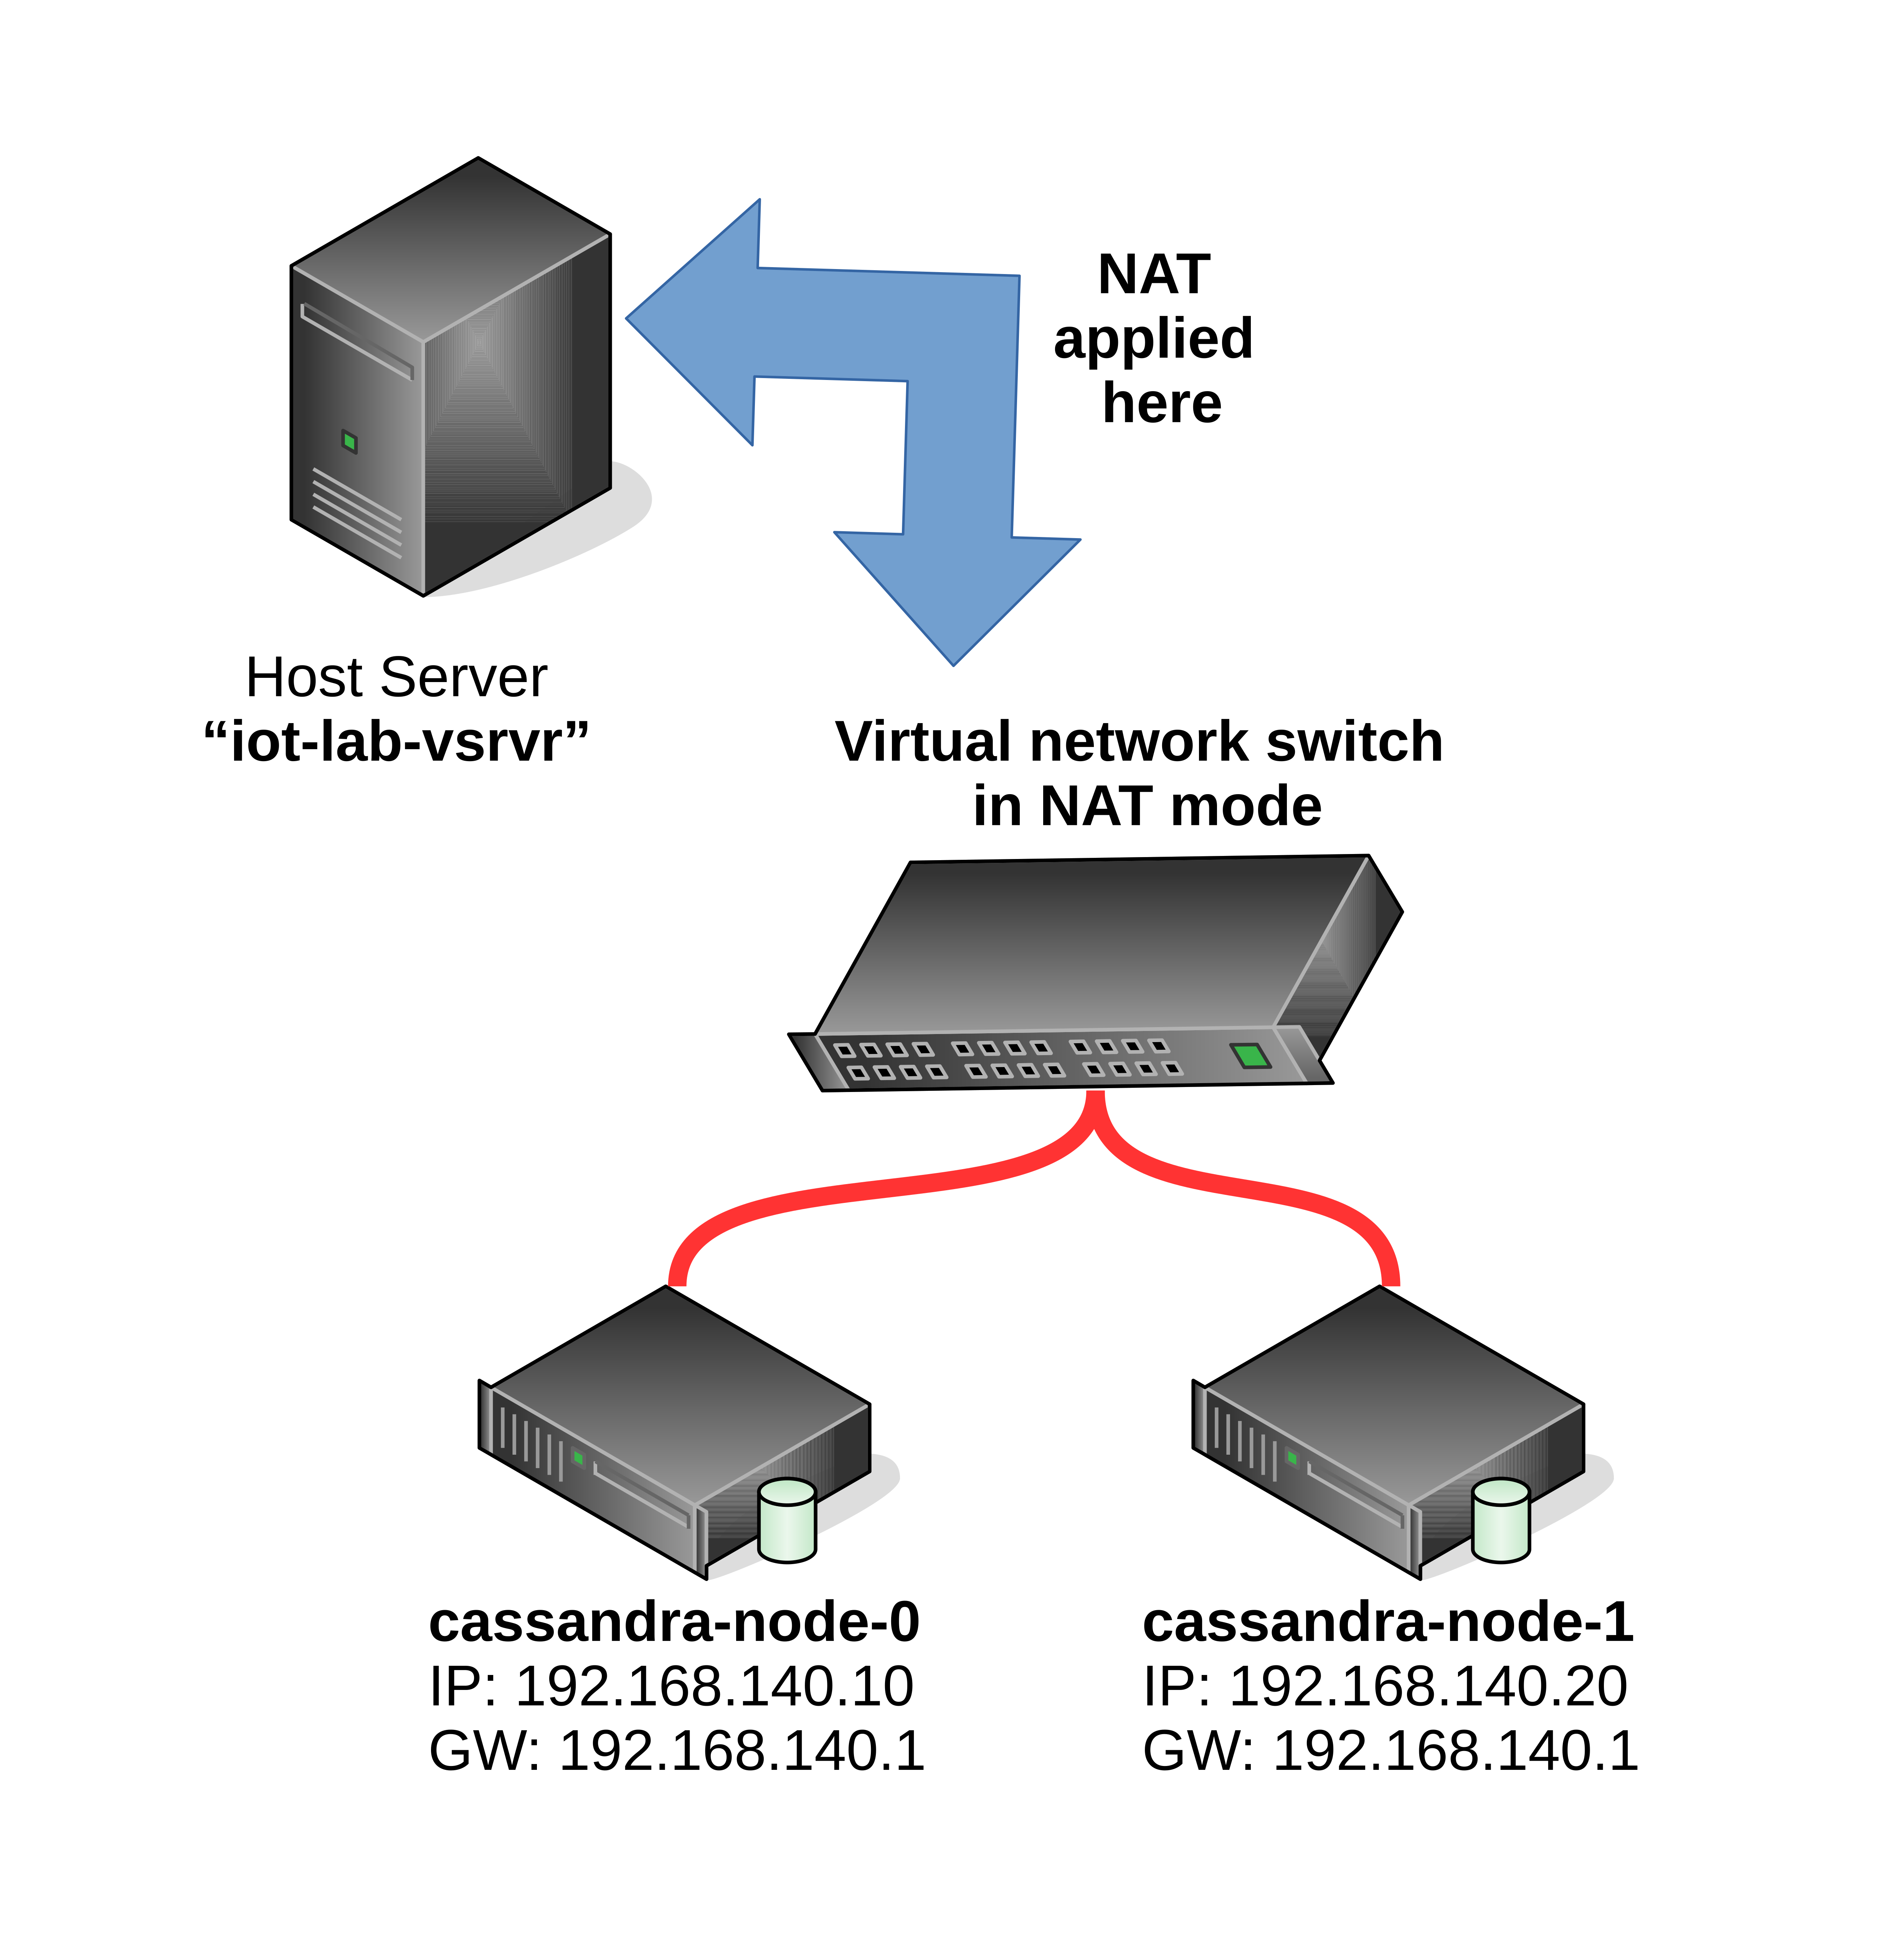
To get the environment on the iot-lab-vsrvr as pictured above,
invoke the bash script:
$ sudo ./start_cassandra_env.bash
To control the virtual Cassandra nodes, you can use the virsh tool
and the following commands:
Command |
Description |
|---|---|
|
list machines and their state |
|
create and start a virtual machine specified in <machine_xml_file> |
|
reboot specified machine by its machine id |
|
shutdown specified machine by its machine id |
virsh provides many more options. For a verbose description of all
of them, consult the manual pages: man virsh
Now that the Cassandra nodes are running try to login from the
iot-lab-vsrvr:
Credentials:
Hostname |
IP address |
Username |
Password |
|---|---|---|---|
|
|
|
|
|
|
|
|
$ ssh <Username>@<IP address>
Due to simplicity we always act as root user on the Cassandra database nodes in this lab. Never do this in a productive environment. For example you can create a specific application user.
On each Cassandra node the Cassandra application package is already downloaded. To build a simple cluster with our two nodes, we have to define a seed node and another normal node.
Let’s start with the configuration of the seed node:
Login via ssh to the Cassandra node with the IP address
192.168.140.10, this is our seed node:
cd /usr/local/bin
tar xvf apache-cassandra-2.1.11-bin.tar.gz
cd apache-cassandra-2.1.11/conf
vim cassandra.yaml
Now we can edit the configuration file:
starting characters of line |
actual value |
new value |
|---|---|---|
|
|
|
|
|
|
|
|
|
|
|
|
Where:
rpc_addressis the address on which Cassandra listens for calls from clients, e.g. CQL queries.listen_addressis the address on which Cassandra listens to the other Cassandra nodes in the cluster.
When finished editing the configuration file (cassandra.yaml), leave
the insertion mode of the vim editor by hitting ESC. Write :wq
in order to write down the changes and leave the vim editor.
In productive environments it is an optimization to have different interfaces / subnets for synchronising the Cassandra nodes and process CQL queries from applications or database administrators.
Now let things roll:
cd ..
bin/cassandra
The node should now start up. This may take a while. Wait until you see a message on your console like:
INFO 19:01:40 No gossip backlog; proceeding
The seed node is now started. Now open another terminal on
iot-lab-vsrvr and repeat the whole configuration procedure for the
other Cassandra node with the IP address: 192.168.140.20. Keep in
mind to use the correct IP addresses and specify the right seed node
(192.168.140.10).
If everything worked flawlessly, open two other terminals on
iot-lab-vsrvr and connect to the two Cassandra nodes as root via
ssh and type:
/usr/local/bin/apache-cassandra-2.1.11/bin/nodetool status
An exemplary output would look like:
Datacenter: datacenter1
=======================
Status=Up/Down
|/ State=Normal/Leaving/Joining/Moving
--  Address         Load       Tokens  Owns (effective)  Host ID                               Rack
UN  192.168.140.10  51.65 KB   256     100.0%            52ae0bff-9b6a-4020-b78a-e6175f6aa8f8  rack1
UN  192.168.140.20  66.06 KB   256     100.0%            f78bafe4-558e-473e-8137-2165337dda39  rack1
UN stands for Up Normal which means your node runs as
expected and no serious errors were reported during the startup.
Get in touch with the cqlsh and CQL
To run database queries we use the CQL shell (cqlsh), which comes
with the Cassandra installation package. The sample queries we run
from the host iot-lab-vsrvr.
Open a terminal on the iot-lab-vsrvr and make sure that you are
in your ~ directory (/home/iotusr).
Start the cqlsh by typing: ./cqlsh -C 192.168.140.[12]0 9042
It doesn’t matter if you connect to node 0 or node 1.
(To get more information about the cqlsh, type ./cqlsh -help)
As you may have noticed, we connected to the database without any authentication. Again, NEVER EVER do this in productive environments.
If you want to harden your Cassandra cluster by enabling and configuring security settings / adding users / alter passwords / … you may find a good entry point to this topic at: http://www.datastax.com/dev/blog/a-quick-tour-of-internal-authentication-and-authorization-security-in-datastax-enterprise-and-apache-cassandra
Now lets run a few simple queries against our Cassandra cluster from
the cqlsh. In most cases we call pre-written scripts. These are
located in the ~ directory of the user iotusr on the
iot-lab-vsrvr.
If you want to use further CQL statements e.g. in your application later on you can always consult an up to date CQL documentation at: http://docs.datastax.com/en/cql/3.1/cql/cql_intro_c.html
Keyspaces
Keyspaces are analogous to databases as you know it from classic relational database engines.
Lets create one, named firstiot. In the cqlsh type:
SOURCE 'create_keyspace.cql' and hit enter.
This will create a keyspace with the replication factor 2. The replication factor you define for a keyspace should never exceed the amount of nodes you run in a cluster. We use a SimpleStrategy for replication which is sufficient for a single datacenter. Study the script ‘create_keyspace.cql’.
Table creation
To create our first table in the keyspace firstiot you can run the
script by typing the following in the cqlsh:
SOURCE 'create_table.cql'
Study the script ‘create_table.cql’.
To work on the keyspace firstiot type: USE firstiot;
Let’s see if our table has been created as expected:
DESCRIBE TABLES;
DESCRIBE TABLE sen_logging;
Inserting data
To create our first dataset in our table sen_logging you can run
the script by typing the following in the cqlsh:
SOURCE 'insert_data.cql'
Study the script ‘insert_data.cql’.
Unfortunately our version of the cqlsh does not support UTF-8
characters with a width of more than one byte, when passing queries
via a cql file. As you can see, we are able to smash this bug by the
use of the function blobAsText() and pass a binary representation
of the UTF-8 text string we want to insert into the specific
varchar column.
To check if our data record was inserted correctly, we can perform a select statement on our table:
USE firstiot;
SELECT * from sen_logging;
Deleting data
To delete the previously inserted data record you can invoke the
following commands in the cqlsh:
USE firstiot;
DELETE from sen_logging WHERE client_id = '<client_id>';
Check if the table is blank again:
SELECT * from sen_logging;
Store the data provided by the Raspberry Pi’s
In this section we are going to modify the well known application from the previous laboratory (MQTT) to publish data via a broker to an Apache storm application, where the data is written to our Cassandra cluster.
Provide data from the Raspberry Pi
To generate some data that can be written to our Cassandra cluster,
let’s add a RandomSpammerResource class which does exactly this
task.
Study the code of the MQTT_thing-rg-0.2-dbg application. The
RandomSpammerResource thread generates data and publishes it to
a broker, just the way the TimeResource thread did in the last
MQTT laboratory. Deploy the application to your Raspberry Pi
device and launch it, e.g.:
On your development host:
$ scp -r MQTT_thing-rg-0.2-dbg pi@<rpi-ip-address>:/home/pi
On your Raspberry Pi device from within
MQTT_thing-rg-0.2-dbg/MQTT_thing-rg/src:
$ python3 mqttthing.py
The data should be published as message in SenML. To check if the random generator works correctly, subscribe to the given topic with a console tool, e.g.:
$ mosquitto_sub -h 172.16.32.5 -t iot/labs/04/randomspammer -v
You may have noticed that all Raspberry Pis publish to the same topic. To distinguish which device published a message, the hardware address is published within the payload too (key: bn). Ensure that the hardware address of your Raspberry Pi appears in the subscribed messages.
Sensor Markup Language – SenML
In short, the sensor markup language specifies, how recorded data from a sensor can be structured. The whole specification is available at: https://tools.ietf.org/html/draft-jennings-core-senml-02
To format the messages we use the JSON representation of SenML. The base object variables have the following structure:
+------------+------+--------+
|      SenML | JSON | Type   |
+------------+------+--------+
|  Base Name | bn   | String |
|  Base Time | bt   | Number |
| Base Units | bu   | Number |
|    Version | ver  | Number |
+------------+------+--------+
Further on there are measurement or parameter entries which represent as follows:
  +---------------+------+----------------+
  |         SenML | JSON | Notes          |
  +---------------+------+----------------+
  |          Name | n    | String         |
  |         Units | u    | String         |
  |         Value | v    | Floating point |
  |  String Value | sv   | String         |
  | Boolean Value | bv   | Boolean        |
  |     Value Sum | s    | Floating point |
  |          Time | t    | Number         |
  |   Update Time | ut   | Number         |
  +---------------+------+----------------+
An example about how the random data could be formatted:
{
   "bn": "b8:27:eb:f5:bf:53",
   "e": [{"t": "1477672722000", "n": "iot/labs/04/randomspammer", "u": "C",
          "sv": "520"}]
}
To deal with JSON, we use the json module which comes with the default libraries of a python interpreter installation.
A basic Code snippet from the json module, which creates a json structure like the pictured above:
    '''
    Mapping Python/JSON "Types"

    JSON              Python
    ============================
    object            dict
    array             list
    string            str
    number (int)      int
    number (real)     float
    true              True
    false             False
    null              None
    '''

    random_data = { }
    sensor_list = [ ]
    measurement = { }

    random_data[ 'sv' ] = value
    random_data[ 't' ]  = timestamp
    random_data[ 'u' ]  = unit
    random_data[ 'n' ]  = self.pub_topic

    sensor_list.append( random_data )

    measurement[ 'e' ]  = sensor_list
    measurement[ 'bn' ] = self.client_id

    return json.dumps( measurement, sort_keys = False )
Process received data with Apache Storm
Apache Storm is a free and open source distributed realtime computation system. Storm makes it easy to reliably process unbounded streams of data, doing for realtime processing. Storm is simple, can be used with any programming language, and is a lot of fun to use!
Source: http://storm.apache.org/
In this last section of the lab, we do have a quick look at the Apache Storm framework. We use it to write the data published by the Raspberry Pi’s to our previously set up Cassandra cluster.
Architecture Overview
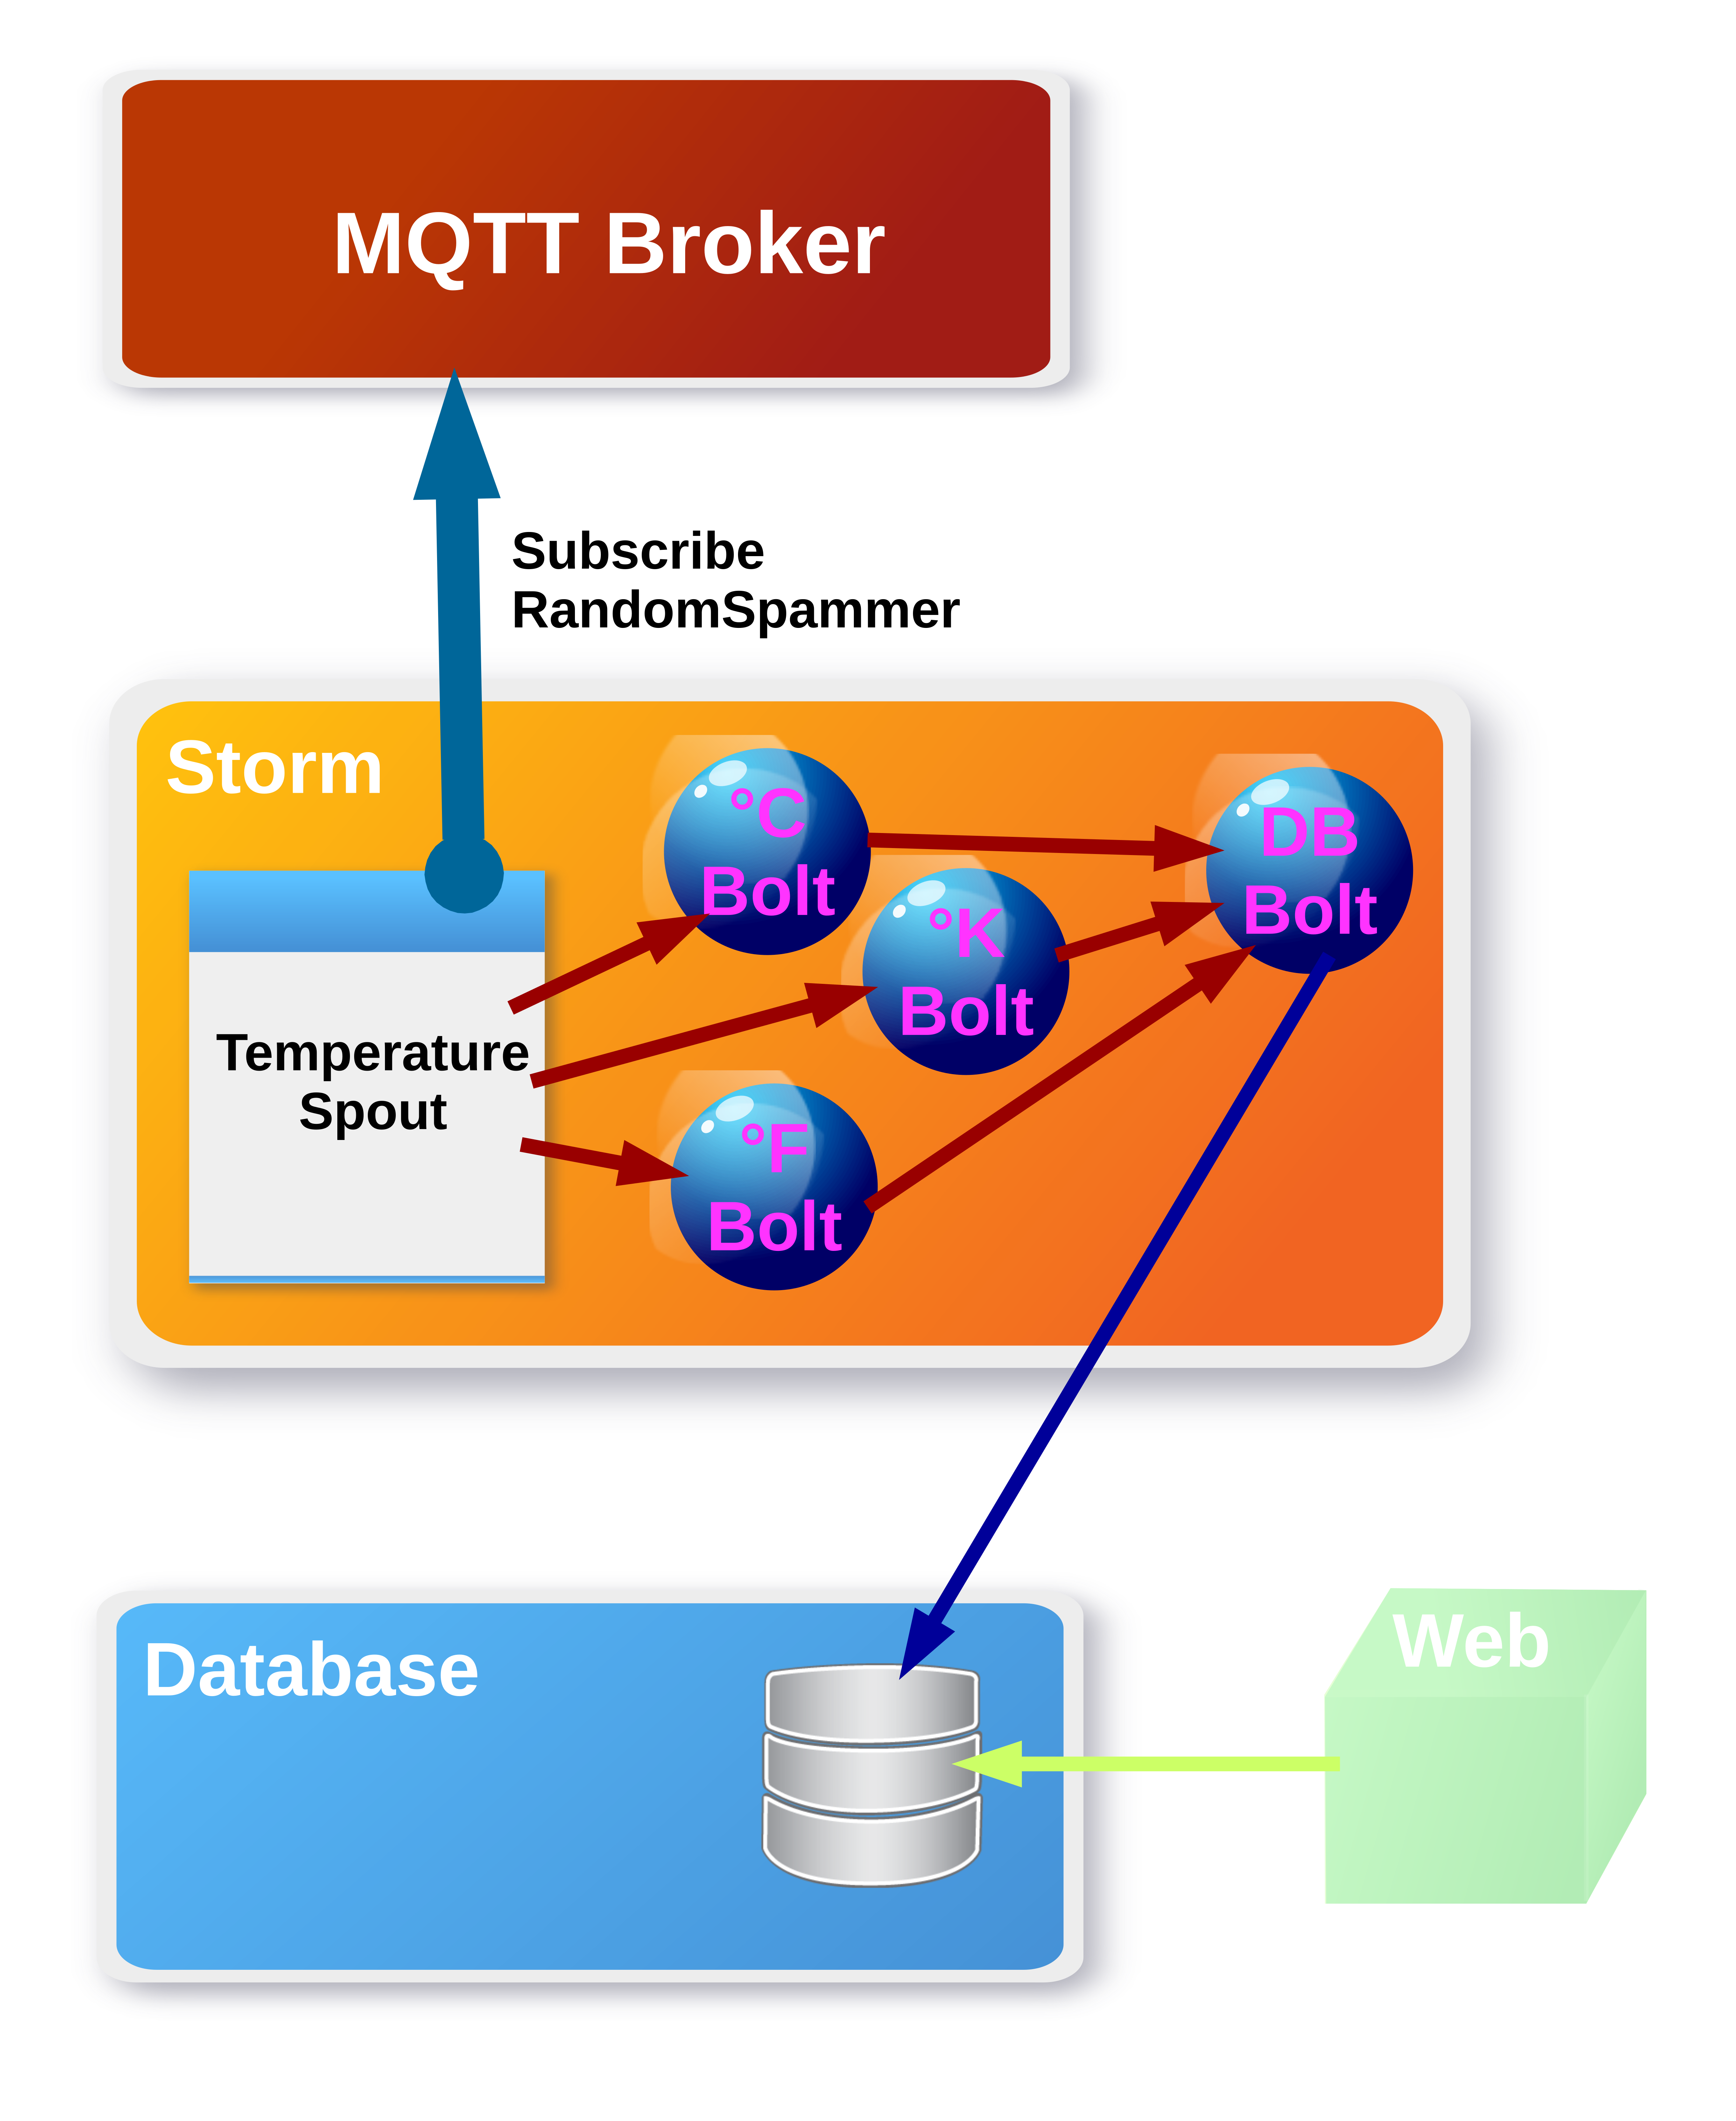
On the iot-lab-vsrvr there is a version of the JDK and eclipse
installed (icon on the desktop). Open it and choose the pre-selected
workspace. Study the application iot_lab4_mqtt-storm. It’s
implemented as pictured above. We assume, our Randomspammer delivers
temperature data in various units (°C, °F, °K).
Therefore we set up 1 temperature spout, which has 4 bolts available to process data. How the bolts are chained to achieve the workflow pictured above is visible in the class TemperaturSpout. You have also the possibility to define multiple worker threads for each bolt, e.g. if you expect much more temperature data whose temperature unit is °K.
builder.setBolt( "temperatureKelvinBolt",
                 new TemperatureKelvinBolt(), 1 )
               .shuffleGrouping( "temperature" );
In our sample application we use 1 worker thread for each bolt, which is sufficient for this topic. You can now start the application iot_lab4_mqtt-storm: Right click on the MQTTTopology class > Run As > 2 Java Application. If you want to receive just your own random messages, change the topic name to an individual name other than “iot/labs/04/randomspammer”.
Deploy the sample random data generator application (MQTT_thing-rg-0.2-dbg) project to your Raspberry Pi and start it. If you want just your own random messages change the topic name to an individual name, other than iot/labs/04/randomspammer.
We have now a running environment with the following components:
Cassandra database cluster on
cassandra-node-0andcassandra-node-1.At least 1 Raspberry Pi device which acts as random data publisher.
MQTT broker.
Apache Storm powered application which acts as subscriber and writes the published data to our keyspace
firstiotinto the tablesen_logging.
To check if the random sensor data from the Raspberry Pi random data
generator application are written correctly to the Cassandra cluster,
open a cqlsh on the machine iot-lab-vsrvr and run some select
statements against the database, i.e.:
./cqlsh -C 192.168.140.10 9042
SELECT * FROM firstiot.sen_logging;
If you still have time and energy, customize the applications and try to log data from components of your choice that you have attached to your GrovePi board.
Grading
4 points maximum will be awarded for completion of the exercises.